Scalability with MariaDB
SCALABILITY FOR MISSION-CRITICAL DATA-INTENSIVE APPLICATIONS
MariaDB supports all scalability needs – whether there are ten or tens of millions of users. Scale up with more cores, memory and storage with MariaDB Enterprise Server and scale out reads, writes and storage with hundreds of instances.
Why choose MariaDB when enterprise Scalability is required
Compression
Reduce the size of data on disk by 33-66% using InnoDB or MyRocks table compression, or compress only specific columns.
Partitioning
Partition large tables by range, list or hash to improve query and index performance, and use multiple disks/different disks per partition.
Parallel query
Use multiple threads to execute aggregates, sorts, joins and more on multiple partitions at the same time – scale up linearly with cores.
Read replicas
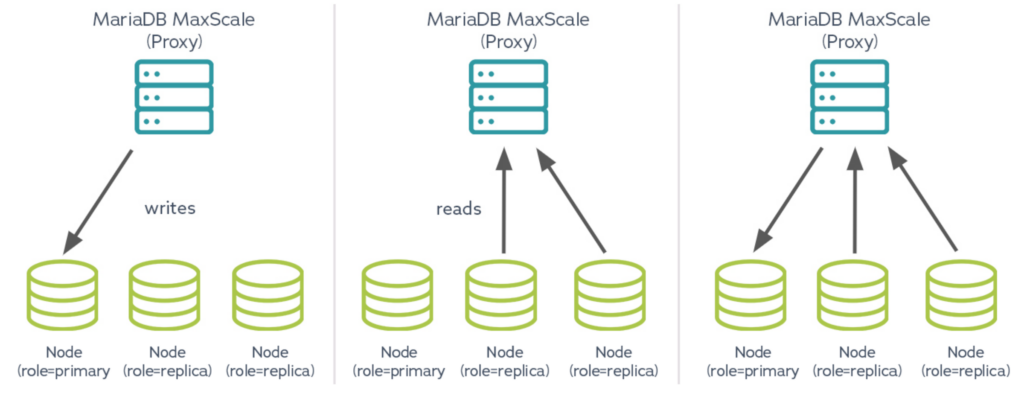
Add read replicas using asynchronous and semi-sync replication, or use MaxScale as a replication server for hundreds.
Sharding
Spread table partitions across multiple database instances to scale out reads, writes and storage transparently to applications.
read scalability with read-write splitting and multiMASTER node clustering
With MariaDB Enterprise Server and MaxScale, multimaster clustering is used for both high availability and read scalability, the database proxy can assign the role of primary to a single node (and route writes to it) while assigning the role of replica to the remaining nodes (and load balancing reads across them). In multi-primary clusters, routing all writes to the same node prevents deadlocks and write conflicts.